Add Storage Accounts
- 16 Sep 2021
- 2 Minutes to read
- Contributors

- Print
- DarkLight
- Download PDF
Add Storage Accounts
- Updated on 16 Sep 2021
- 2 Minutes to read
- Contributors
- Print
- DarkLight
- Download PDF
Article summary
Did you find this summary helpful?
Thank you for your feedback!
Overview
An Azure storage account contains Azure Storage data objects: blobs, files, queues, and tables. The storage account provides a unique namespace for your Azure Storage data accessible anywhere in the world over HTTP or HTTPS. Cerebrata offers the capability to manage Azure Storage services efficiently with a broad set of tools. Using Cerebrata, user can manage Storage services like blobs, files, queues, tables, storage analytics and cloud service diagnostics. User can add Storage Accounts into the using four ways mentioned below:
- Storage Account Name and key
- Shared Access Signature URI
- Through Azure Subscription
- Emulator Connection
Add Storage Account using Storage Account Name and key
Consider when the Solution architect is provided with the Storage Account name and the key to managing Azure Storage Accounts. Cerebrata supports the option to add Storage Accounts using Account Name and Key. Following are the steps to add Storage Account using Account Name and Key:
- Click on + icon on the Azure Storage Accounts node and select Using Storage Account Name and Key option in the context menu. It will open a popup Add Storage Account connection
- Click Next. It will move to the next window and ask users to provide Storage Account Name, Key, Default Domain details.
- Provide the necessary details. It will also ask the user to provide Friendly Name and Resource Category if required.
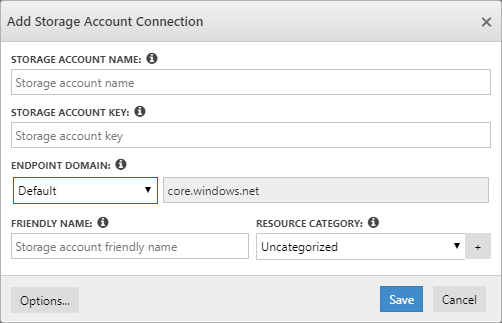
- Click Save to add the Storage Account
Note
Resource Category will be useful to group resources based on various environments or categories, e.g., Dev, Staging, Production. Click here to know more.
Add Storage Account using SAS URI
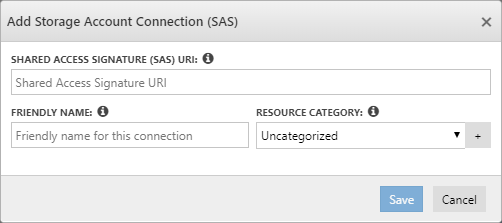
Consider when a developer is provided with SAS URL (Shared Access Signature) to push Azure Storage Accounts data if the developer wants to manage the same Storage Account using SAS URI. With Cerebreata, it is possible to add and manage Storage Accounts using SAS URI. Following are the steps to add Storage Account using SAS URI:
- Click on + icon on the Azure Storage Accounts node and select Using Shared Access Signature (SAS URI) option in the context menu. This will open a popup Add Storage Account connection (SAS)
- Provide SAS URI, Friendly Name and Resource Category and Click Save to add the Storage Account
Add Storage Emulator
Cerebrata also supports capabilities to manage local Storage account running using Azure Storage Emulator or Azurite. Following are the steps to add a local Storage Account using Azure Storage Emulator credentials:
- Click on + icon on the Azure Storage Accounts node and select New Emulator Connection option in the context menu. This will open a popup Add Storage Account connection
- Click Next and Provide the Storage services Endpoints. Also, Provide a Friendly Name and choose Resource Category if required
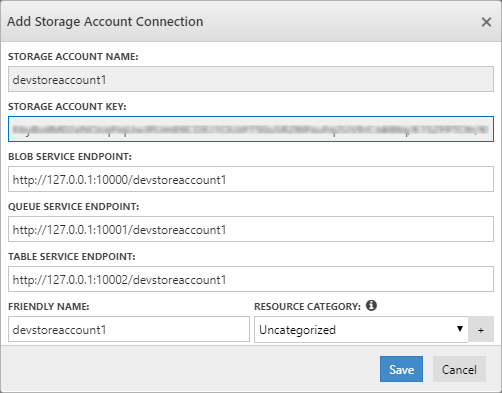
- Clicking Save will add the local Storage Account under the Azure Storage Account node.
Warning
On Windows operating systems, you can either use "Microsoft Storage Emulator" (which is part of Azure SDK) or "Azurite" (which is an open-source storage emulator) as a storage emulator to be used with Cerebrata. Please ensure that one of them is installed and running.
To know more
Microsoft Storage Emulator:
https://docs.microsoft.com/en-us/azure/storage/storage-use-emulator
Azurite:
https://docs.microsoft.com/en-us/azure/storage/common/storage-use-azurite
Add Storage Account through Azure Subscription
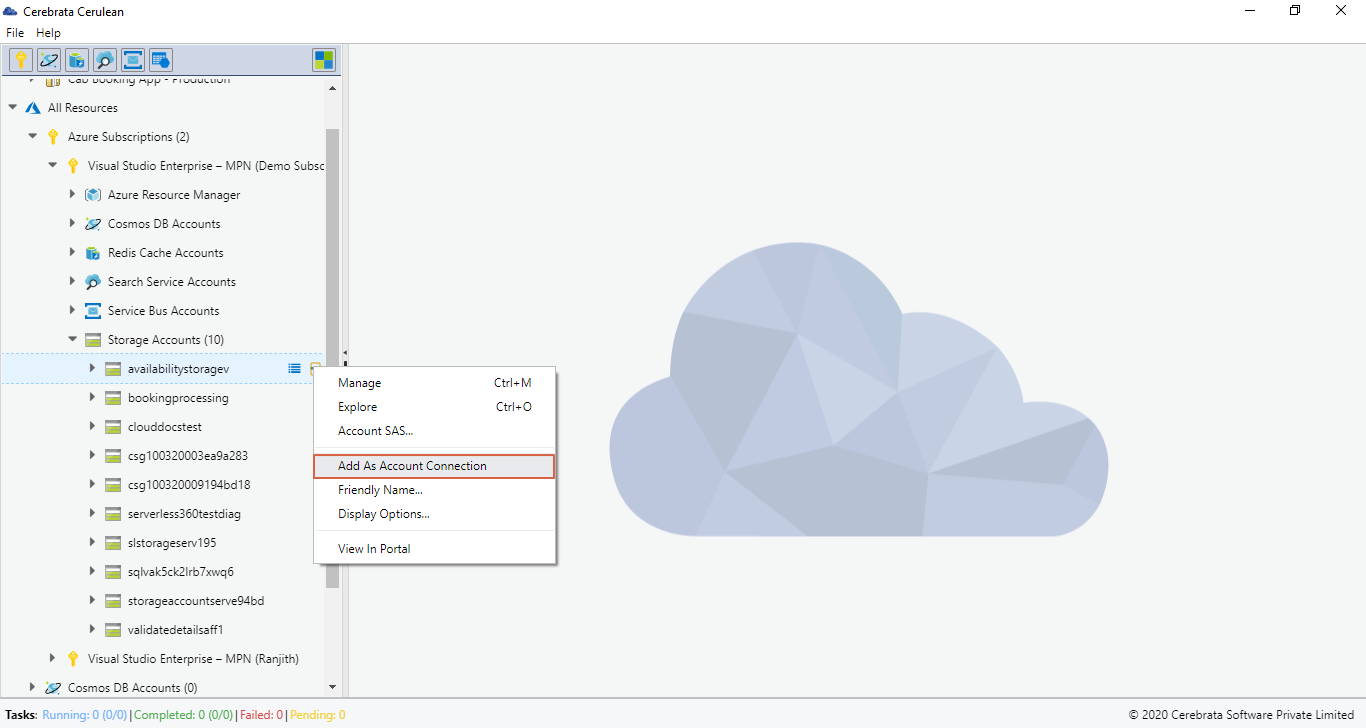
Cerebrata also offers an option to add Storage Account through the existing subscriptions already added. Following are the steps to add Storage Accounts using Azure Subscription:
- Expand the appropriate Azure Subscription node and select Azure Storage Account node.
- This will list all the Azure Storage Accounts available in the Subscription.
- Select the required Subscription to be added. Go to the context menu and select Add as Account Connection to add the storage account into Cerebrata
Was this article helpful?