Manage Storage Accounts
- 16 Sep 2021
- 4 Minutes to read
- Contributors

- Print
- DarkLight
- Download PDF
Manage Storage Accounts
- Updated on 16 Sep 2021
- 4 Minutes to read
- Contributors
- Print
- DarkLight
- Download PDF
Article summary
Did you find this summary helpful?
Thank you for your feedback!
Edit Storage Account Connection
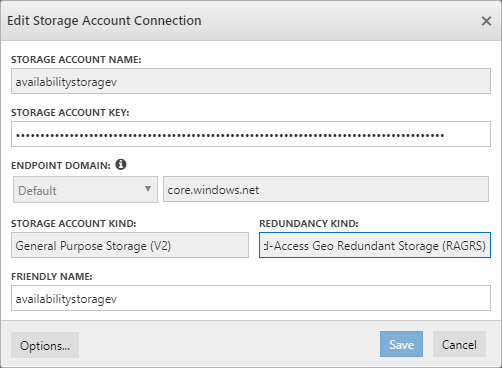
Consider when the user needs to edit the friendly name and Key of the Azure Storage Account. User can do it either by clicking on Edit button or selecting Edit option in the context menu. It will open a popup that allows the user to change the friendly name and key of the Azure Storage Account, as shown below:
View Properties
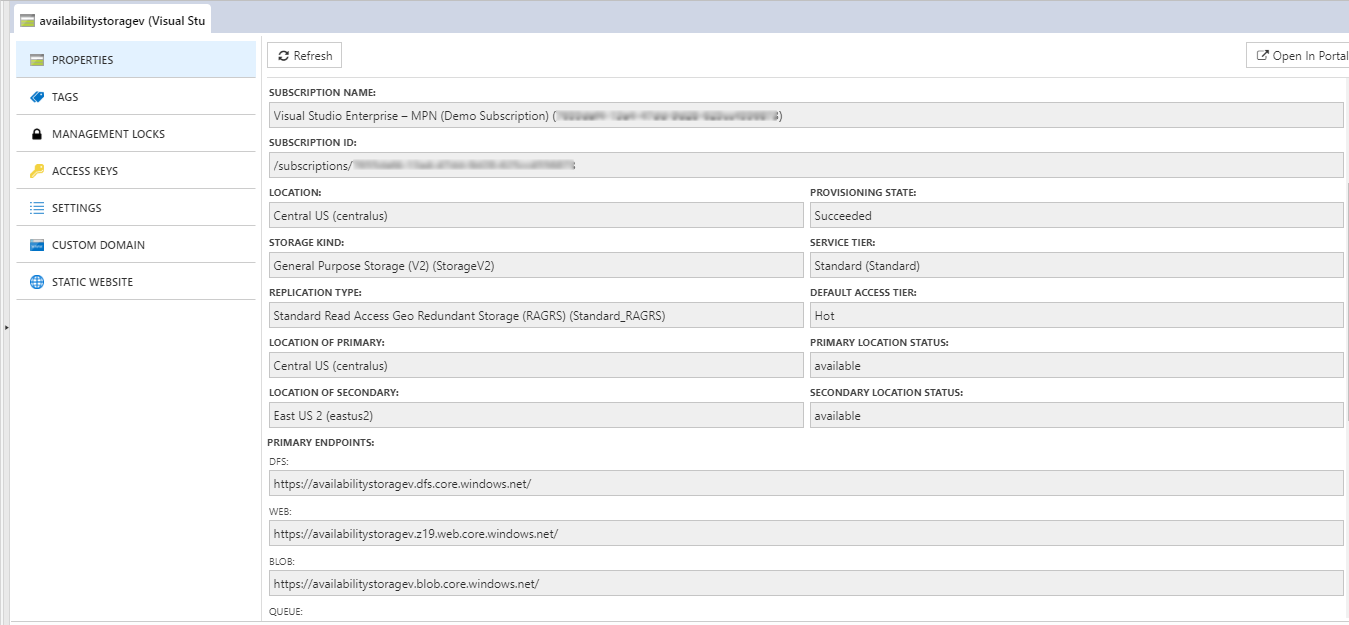
Consider if the need is to check if the Primary and secondary location of the Azure Storage Account is enabled or disabled. Cerebrata allows user to view properties of Azure Storage Accounts like Location Status, Subscription Id and more. Following are the steps to view the properties of Azure Storage Accounts:
- Select the context menu of the appropriate Azure Storage Account and click Manage
- Click Properties in the window to view the Storage Account properties as shown below
Manage Locks
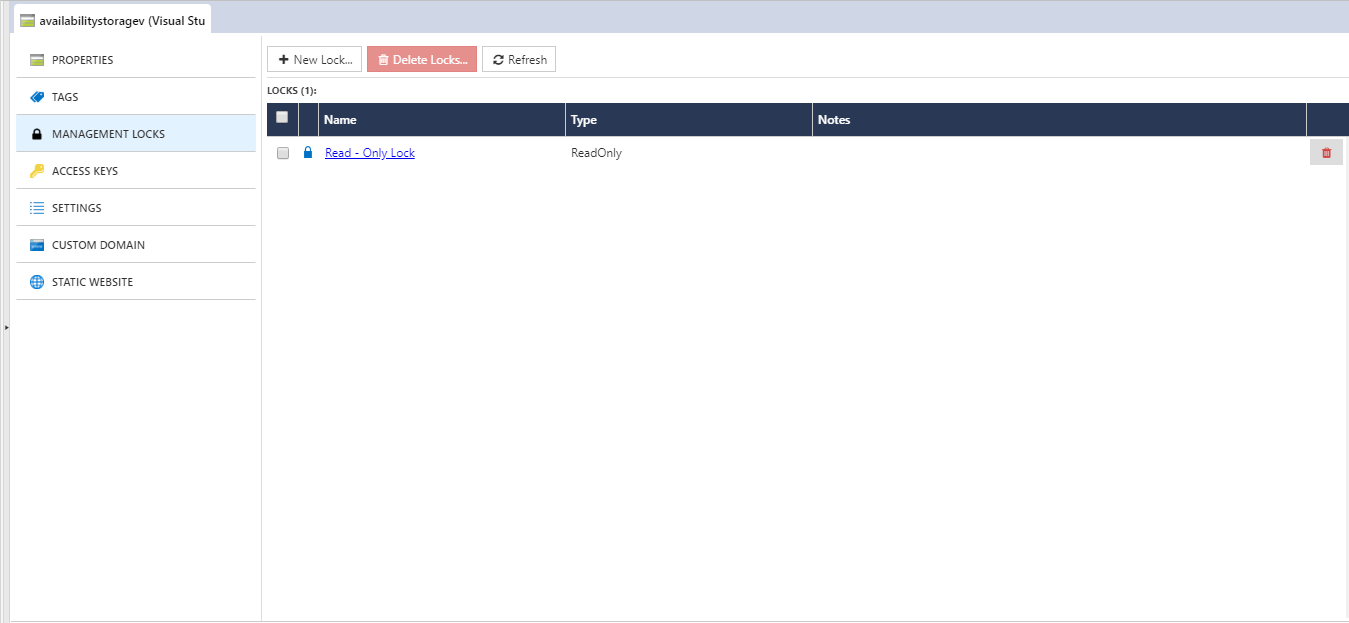
The administrator may need locking mechanisms for subscriptions, resource groups or resources to prevent other users from accidentally deleting or modifying critical resources. Using Management locks, the user can lock the subscription or resources in Azure. Cerebrata also supports Management locks which will be handy for developers or admins to quickly navigate and lock the appropriate resources without switching to the Azure portal. User can create, modify and delete Locks from Cerebrata.
Following are the steps to manage Locks for Azure Storage Accounts in Cerebrata:
- Select the context menu of the appropriate Azure Storage Account and click Manage
- Click Management Lock, which will list the existing locks of the specified Storage Accounts
Note
Click here to know more about Management Locks in Azure
Access Keys
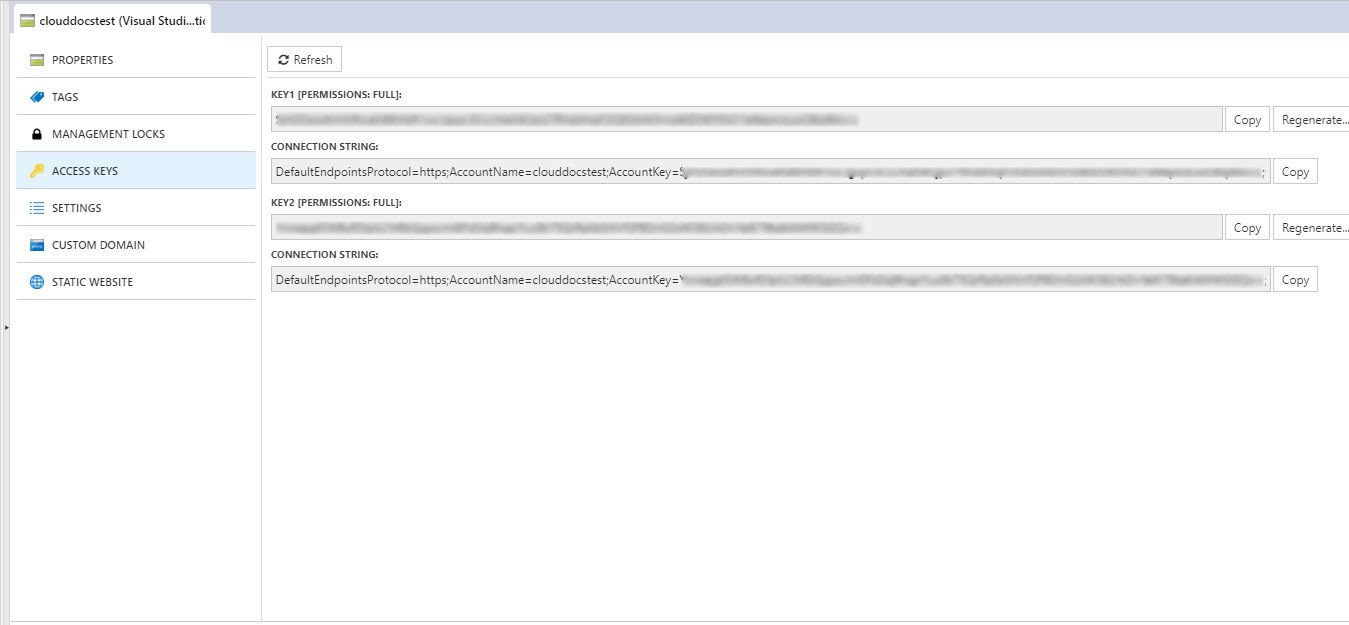
Access keys are the 512-bit secured keys used to authorize access to data in your storage account via Shared Key authorization. Cerebrata provides the option to get these access keys. It also includes the ability to regenerate new Access Keys.
Following are the steps to manage Access Keys for Azure Storage Accounts in Cerebrata:
- Select the context menu of the appropriate Azure Storage Account and click Manage
- Click Access Keys, which will list the existing Access Keys and Connection strings available.
Manage Shared Access Signature
Along with Access Key, user can even manage Shared access Signature for Azure Storage Account using Cerebrata. It also provides the option to define the access level that needs to be provided for a SAS Token. Click here to know about Shared Access Signature
Following are the steps to create SAS Token and URL for Azure Storage Account by defining the granular access:
- Select the context menu of appropriate Azure Storage Account added through Connection string and click Account SAS
- This will open a Popup "Account Shared Access Signature (SAS)"
- Select the level of access that needs to provide along with the Expiry date of the SAS Token
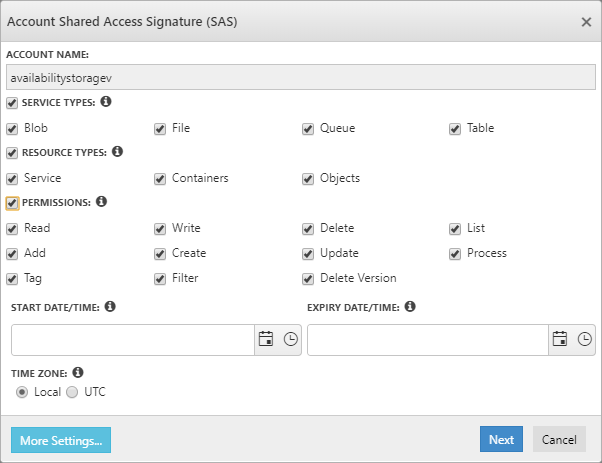
- Click Next to get the SAS URL and Token for the selected Storage Account.
Note
Cerebrata also offers an option to restrict the IP Address and protocol using Advanced settings. Click More Settings in the left bottom of the dialog to open Advanced SAS Settings.
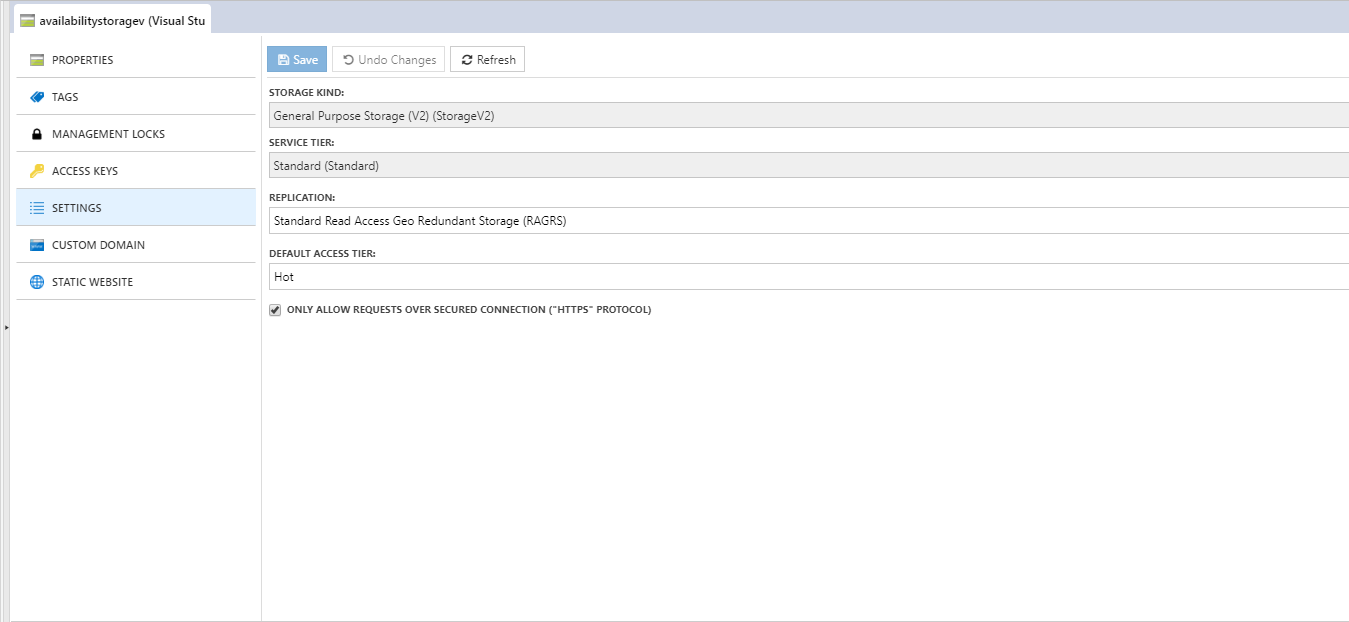
Change Settings
User can change Replication or Access tier of the Azure Storage Account from Settings. It is also possible to only allow the requests through a secured connection to the Storage Account.
Following are the steps to change the Replication and Access Tier of a Storage Account:
- Select the context menu of the appropriate Azure Storage Account and click Manage
- Select Settings. Change Replication and Access Tier as required.
- Click Save to the settings
Custom Domain
Map your custom domain with your Azure Storage Account blob using Cerebrata.
Following are the steps to define a custom domain name to a Storage Account Blob:
- Select the context menu of the appropriate Azure Storage Account and click Manage
- Select Custom Domain. Provide your custom domain.
- Click Save to verify and save the custom domain
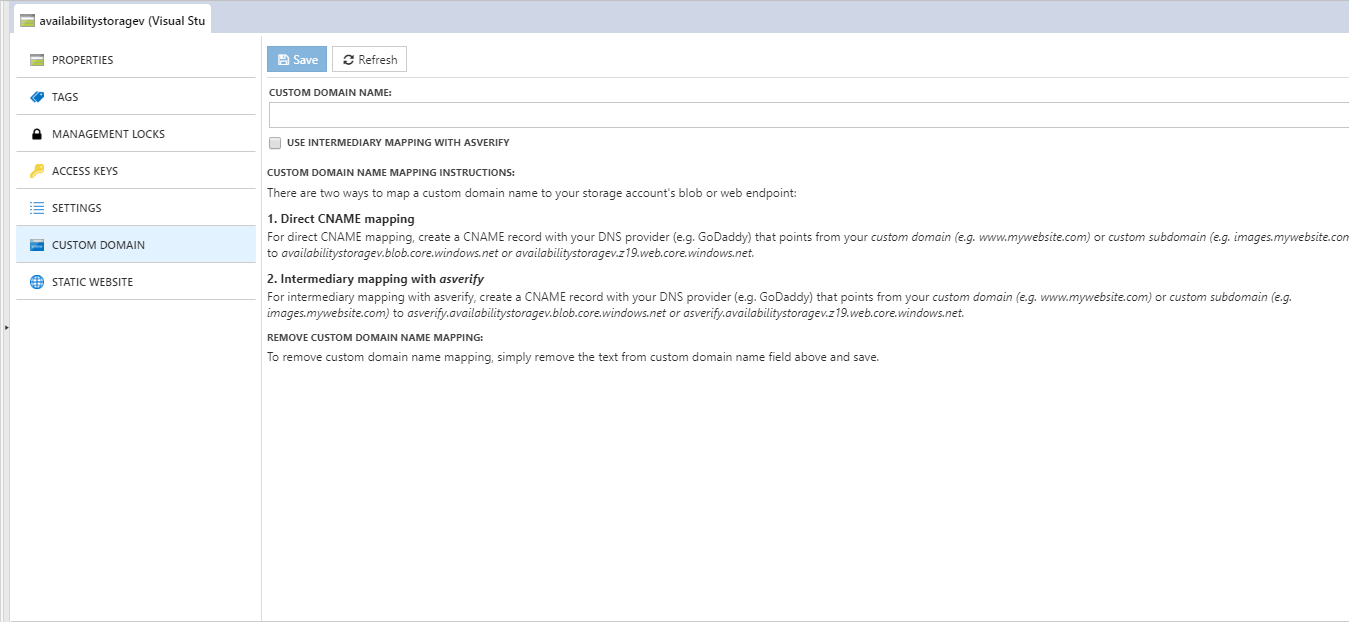
There are two ways to map a custom domain name to your storage account's blob or web endpoint:
- Direct CNAME mapping:
For direct CNAME mapping, create a CNAME record with your DNS provider (e.g. GoDaddy) that points from your custom domain (e.g. www.mywebsite.com) or custom subdomain (e.g. images.mywebsite.com) to <storage_account_name>.blob.core.windows.net or <storage_account_name>.z19.web.core.windows.net. - Intermediary mapping with as verify:
For intermediary mapping with as verify, create a CNAME record with your DNS provider (e.g. GoDaddy) that points from your custom domain (e.g. www.mywebsite.com) or custom subdomain (e.g. images.mywebsite.com) to asverify.<storage_account_name>.blob.core.windows.net or asverify.<storage_account_name>.z19.web.core.windows.net.
To remove custom domain name mapping, remove the text from the custom domain name field above and save it.
Click here to know more about Custom Domain in Azure Storage Account
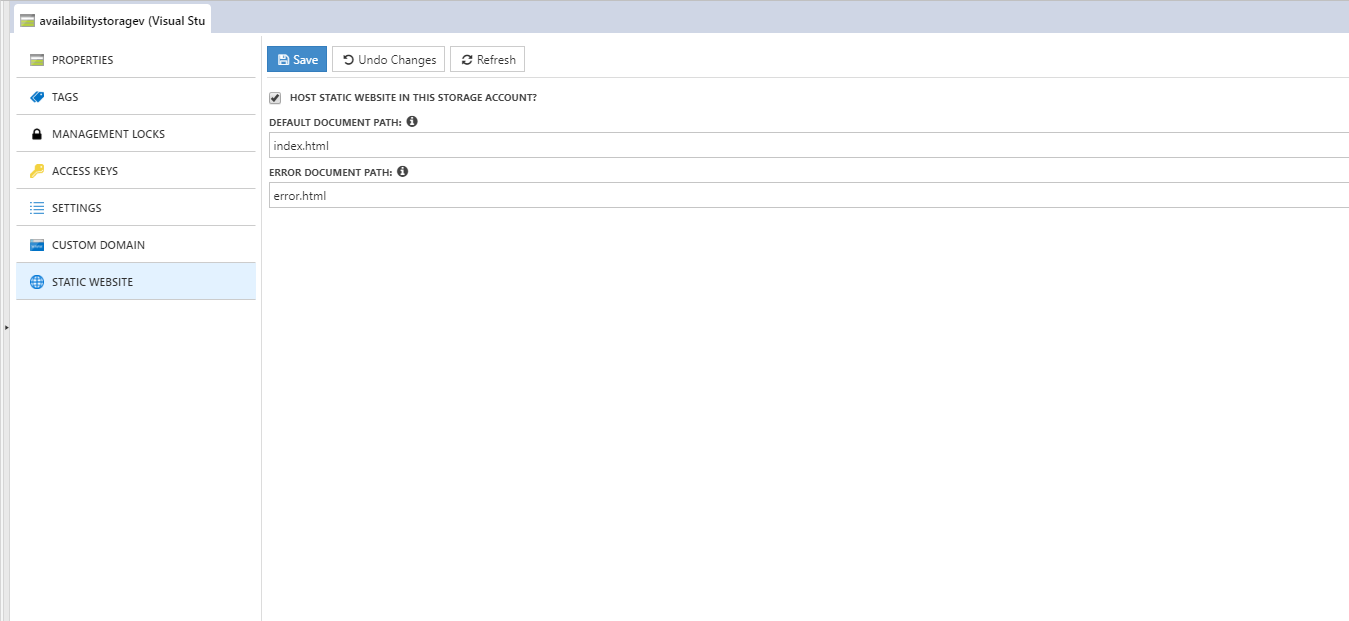
Static Website
Consider when there is a need to host a static website using HTML Page stored in a Storage Account. Static Website option in Storage Account allows user to achieve static hosting through Storage Account.
Following are the steps to enable Static Website through Azure Storage Account:
- Select the context menu of the appropriate Azure Storage Account and click Manage
- Select Static Website. Provide the path to index.html stored in the Storage blob. And also provide the path to Error Page (404).
- Click Save to verify and save to Host a Static Website
Display Options
Using Cerebrata, user can manage different Azure resources like Storage Account, Service bus, Cosmos DB and more. User may not have specific resources, but the respective type will always be visible regardless of resources availability. Here come the Display options for Storage Accounts; the user can choose the resource type they want to display in the navigation. Following are the steps to manage display options in Cerebrata:
Select the context menu of the appropriate Azure Storage Account and click Display Options
This will open a popup with options to select the required resource types to display, as shown below:
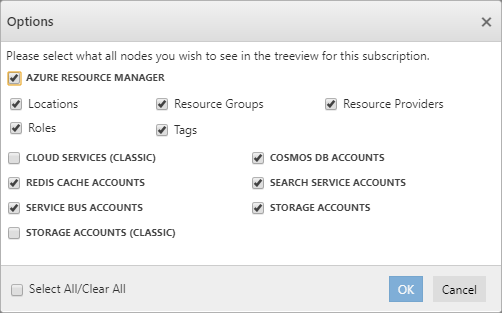
Select OK to see the focused list of Resource types in the left navigation
Was this article helpful?