Manage Blob Containers
- 27 Oct 2021
- 3 Minutes to read
- Contributors


- Print
- DarkLight
- Download PDF
Manage Blob Containers
- Updated on 27 Oct 2021
- 3 Minutes to read
- Contributors
- Print
- DarkLight
- Download PDF
Article summary
Did you find this summary helpful?
Thank you for your feedback!
Manage Metadata
User-defined metadata consists of one or more name-value pairs that you specify for a Blob storage resource. You can use metadata to store additional values with the resource. Metadata values are for your own purposes only, and don't affect how the resource
behaves. Using Cerebrata, user can create, delete, edit the Blob container meta data.
Following are the steps to create a metadata:
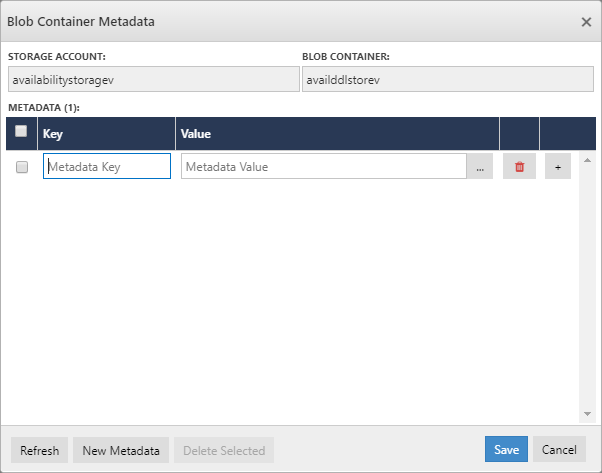
- Select the context menu of the Blob Container and click Metadata
- It will open a popup "Blob Container Metadata" that shows list of exsisting Key Value metadata
- Click New Metadata and Add Your Key Value Metadata and hit Save
Change Lease State
The Lease Blob operation creates and manages a lock on a blob for write and delete operations. The lock duration can be 15 to 60 seconds. Using Cerebrata, user can change the lease state of a Storage Blob Container. Below are five modes Lease state available,
The Lease Blob operation can be called in one of five modes:
- Acquire, to request a new lease.
- Renew, to renew an existing lease.
- Change, to change the ID of an existing lease.
- Release, to free the lease if it is no longer needed so that another client may immediately acquire a lease against the blob.
- Break, to end the lease but ensure that another client cannot acquire a new lease until the current lease period has expired.
Properties
For Storage Blob Container, user can check the properties of the Storage Blob Container like the present lease state or when the Storage Blob last modified.
Following are the steps to view the properties of a Storage Blob Container
- Select the context menu of the Blob Container and click Properties
- It will open a popup "Blob Container Properties" that shows the properties like Lease state, Last modified, ETAG and more.
Shared Access Signature & Permissions
Using Cerebrata, user can even manage Shared access Signature for Storage Blob Containers. It also provides option to define the level access that needs to be provided for a SAS Token. It also Permissions to manage the Access Policy of the SAS Token. Click here to know about Shared Access Signature
Following are the steps to create SAS Token and URL for Storage Blob Container by defining the granular access:
Select the context menu of appropriate Storage Blob Container and click Shared Access Signature
This will open a Popup "Blob Container Shared Access Signature (SAS)"
Select the level of access that needs to be provided along with Expiry date of the SAS Token
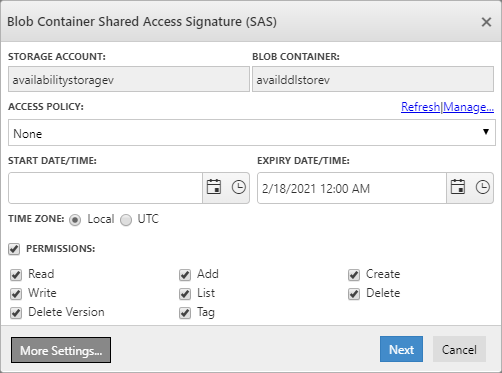
Click Next to get the SAS URL and Token for the selected Storage Blob Container.
Note
Cerebrata also offers option to restrict the IP Address and protocol using Advanced settings. Click More Settings in the left bottom of the dialog to open Advanced SAS Settings.
Export Blob list
Consider if the user wants to export all the Blobs in a CSV format for a Local Backup. Using Export Blob list, User can easily export all the blobs in a Blob Container.
Following are steps to export the blob list:
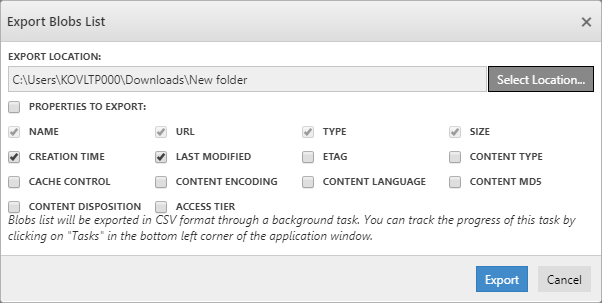
1.Select the context menu of appropriate Storage Blob Container and click Export blob list
2. It will ask user to select the Folder to which the Blob list needs to be exported
3. Once the folder is selected, choose the Properties need to be exported along with Name, URL, Type, Size.
4. Clicking "Export" will trigger a Background Task to export the list of blobs available in a CSV format.
Delete Blob Container
Consider when a QA team created a Storage Blob Container to peform testing. When the testing is over, QA engineer would need to delete that Blob Conatiner in a Storage Account. Here comes Delete option in Cerebrata.
Following are the steps to delete a Storage Blob Container:
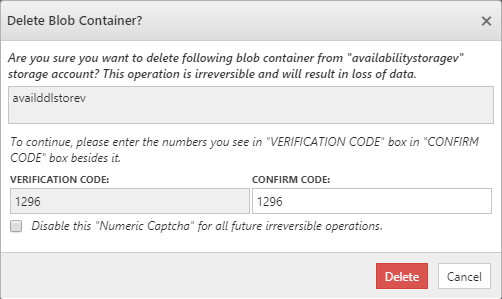
- Select the context menu of the appropriate Blob Container and click Delete
- It will open a popup and ask user to enter the numbers in "VERIFICATION CODE" box into "CONFIRM CODE" box besides it.
- Once the Verification code is entered, Click Delete to delete the Storage Blob Container
Was this article helpful?